Jak układać ceramiczne płytki podłogowe (terakotę)?
Podłoga musi być równa, sucha, czysta i stabilna. Posadzki drewniane powinny mieć dobrą wentylację od spodu i muszą być mocne, by utrzymać ciężar płytek. Najłatwiejszym sposobem przygotowania gładkiego i stabilnego podłoża jest wyłożenie podłogi 1,2 cm płytą pilśniową lub sklejką i przykręcenie płyt wkrętami rozmieszczonymi co 30 cm. Aby wzmocnić przyczepność podłoża, należy pociągnąć całą podłogę farbą gruntową. Następnie musi ona dobrze przeschnąć.
Zawsze należy zaczynać od środka pomieszczenia i przesuwać się w kierunku do ścian. Jeśli zaczniesz układanie od którejś ze ścian, napotkasz trudności w utrzymaniu kątów prostych. Zaznacz punkt środkowy, po czym rozplanuj takie ułożenie płytek, by przy każdej ze ścian znalazły się płytki brzegowe równej szerokości. Sprawdź, czy grubość płytek nie uniemożliwi otwierania drzwi. Jeśli tak, możesz zdjąć drzwi i przyciąć ich dolną krawędź albo tak ustawić zawiasy, by drzwi automatycznie unosiły się przy otwieraniu w górę.
Przy przygotowywaniu kleju do ceramicznych płytek podłogowych należy ściśle trzymać się załączonej przez producenta instrukcji. Najczęściej, po rozmieszaniu kleju, wylewa się go na podłogę w ilości wystarczającej na wyklejenie płytkami fragmentu wielkości około 1 m², następnie wyrównuje się powierzchnię zębatą packą.
Każdą płytkę musisz mocno wcisnąć, przesuwając ją lekko na boki. Po ułożeniu pierwszego metra kwadratowego zmyj klej z płytek i oczyść spoiny, przygotowując je do późniejszego wypełnienia spoiwem. Możesz to zrobić nie wcześniej niż 24 godziny po ułożeniu całej podłogi.
Mocowanie całych płytek
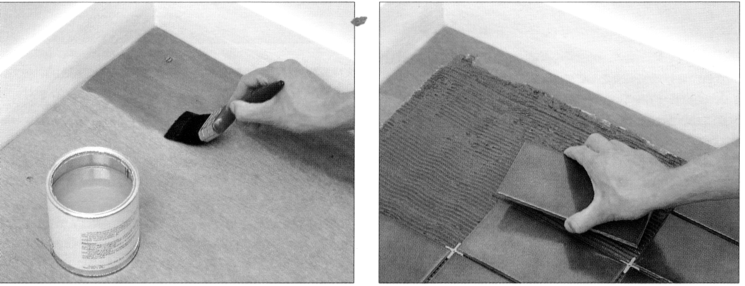
1 Upewnij się, że podłoże jest czyste i równe. Jeśli podłoga jest wyłożona drewnem, połóż warstwę farby gruntowej.
Nanieś na podłogę wodoodporny klej i zacznij nanoszenie płytek w uprzednio zaplanowanym porządku.
2 Każdą płytkę dociśnij lekko obracając na boki. Układaj płytki w kierunku od środka do ścian, przesuwając się wzdłuż wytyczonych kredowych linii. Jeśli krawędzie płytek nie mają wypustek, przedzielaj je plastykowymi krzyżakami.
Przycinanie i naklejanie płytek brzegowych
1 Połóż przeznaczoną do przycięcia płytkę na ostatniej całej płytce, kładąc na wierzch jeszcze jedną płytkę, opierając jej krawędź o ścianę (między płytkę a ścianę należy włożyć krzyżak). Odrysuj linię cięcia.
2 Przyłóż stalową linijkę i przetnij krajakiem płytkę wzdłuż nakreślonej linii, a następnie przetnij płytkę specjalnymi nożycami do glazury. Wygładź krawędzie pilnikiem.
3 Nanieś klej na spód płytki brzegowej i wciśnij ją ostrożnie na miejsce. Powtarzaj przycinanie i naklejanie aż do wypełnienia wszystkich luk, następnie wciśnij w złącza masę spoinową.
WYPEŁNIANIE SPOIN
Można je przeprowadzić 24 godziny po zakończeniu układania płytek. Jeśli zaczniesz to robić, zanim klej stężeje, możesz poprzemieszczać płytki.
Przed rozpoczęciem pracy powyciągaj spomiędzy płytek plastykowe krzyżaki. Kiedy spoiwo stężeje – co zwykle trwa kilka godzin – zetrzyj posadzkę wilgotną szmatką lub gąbką. Staraj się przez dwie doby nie chodzić po świeżo ułożonej posadzce, by nie przemieścić płytek. Jeśli zajdzie taka potrzeba, możesz przemyć podłogę wodą, pod warunkiem, że spoiwo jest już suche.
 Mocowanie całych płytek
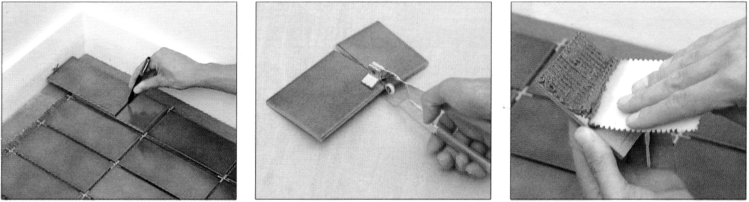 Przycinanie i naklejanie płytek brzegowych


