Tajemnica efektownego ozdobienia ściany płytkami ceglanymi polega na zaplanowaniu realistycznego wzoru. Najłatwiejszym sposobem na zaplanowanie pierwszych rządków płytek jest narysowanie ich na ścianie. Następnie rozsmaruj kielnią klej na spodzie każdej płytki i przyklej ją do ściany. Poszczególne płytki musisz oddzielać od siebie krzyżakami.
Aby efekt był jak najbardziej realistyczny, trzeba będzie kilka płytek przyciąć. Możesz to zrobić za pomocą zarówno elektrycznej szlifierki kątowej zaopatrzonej w tarczę do cięcia materiałów ceramicznych, jak i piły tarczowej. Nieco bardziej pracochłonne jest przecinanie płytek za pomocą specjalnego brzeszczotu (np. wolframowego) osadzonego w oprawie piłki do metali.
Kiedy od przyklejenia miną 24 godziny, możesz usunąć krzyżaki i wypełnić spoiny zaprawą lub masą spoinową. Zaprawę nanosi się małą kielnią murarską, uważając przy tym, by nie zaplamić cegieł. Jeśli nie masz czasu lub ochoty na wypełnianie spoin, możesz przed naklejeniem płytek pomalować ścianę np. zieloną emulsją. Zanim zaczniesz układanie płytek, farba musi dokładnie wyschnąć.
Układanie płytek
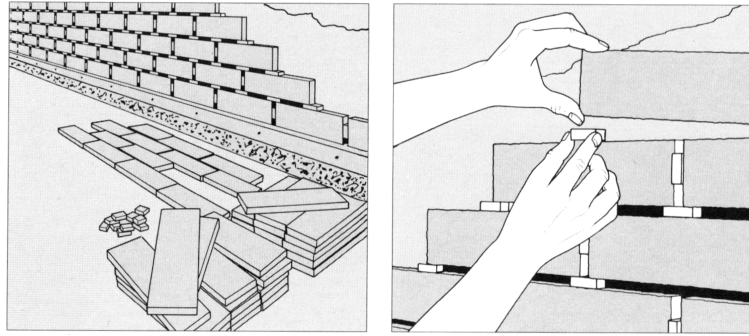
1 Ułóż płytki m podłodze, starając się wypracować najbardziej realistyczny wzór ich ułożenia, po czym naszkicuj go ołówkiem na ścianie. Przemieszczaj złącza pionowe, tak jak na murze z cegły. Na narożnikach – o ile to możliwe – stosuj płytki przycięte w kształt litery L.
2 Aby zapobiec obsuwaniu się płytek, umieszczaj między nimi drewienka grubości około 9 mm. Możesz też pociąć na kawałki styropian z jakiegoś opakowania. Po 24 godzinach usuń rozporki i wypełnij spoiny zaprawą murarską.
 Układanie płytek


?")


