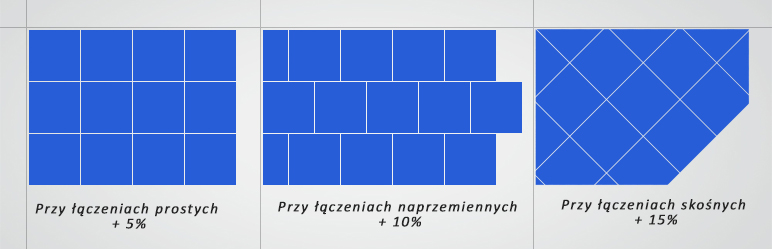
Planowanie jest niezwykle ważną czynnością przy każdej pracy remontowej, szczególnie zaś przy układaniu płytek. Dobry plan pozwoli ci nie tylko osiągnąć porządniejsze i bardziej symetryczne wykończenie, ale także zaoszczędzi niepotrzebnych i kosztownych strat.
Zaznaczanie punktu centralnego
Płytki znajdujące się przy krawędziach ścian i w narożnikach powinny być równej wielkości, dzięki czemu pomieszczenie ma symetryczny wygląd.
W celu osiągnięcia takiego efektu, należy zacząć układanie płytek od środka powierzchni. Gdybyś zaczął w rogu, mogłoby się okazać, że przy jednej ścianie pokoju leżą całe płytki, a przy drugiej połówki. A zatem pierwszą czynnością będzie wytyczenie środków boków powierzchni (najczęściej kwadratu lub prostokąta) i napięcie między środkami przeciwległych boków nasmarowanego kredą sznurka. Następnie należy lekko go odciągnąć i puścić, uzyskując dwie krzyżujące się linie. Miejsce przecięcia kredowych linii będzie punktem centralnym.
Jeśli pomieszczenie ma nieregularny kształt, najlepiej ułożyć pierwszy rząd płytek równolegle do ściany położonej naprzeciwko głównego wejścia. Zaznacz nakredowanym sznurkiem linię równoległą do tej ściany, a następnie, używając cyrkla, zaznacz drugą linię przecinającą pierwszą pod kątem prostym. Wreszcie wyznacz na środku pokoju trzecią linię, prostopadłą do drugiej. Powstały punkt przecięcia wyznacza miejsce ułożenia pierwszej płytki.
Wypracowanie sposobu rozmieszczenia płytek
Najlepiej będzie podzielić pracę na cztery etapy wyznaczone przecinającymi się kredowymi liniami. Najpierw ułóż płytki po skosie do rogów pokoju, tak aby od razu obliczyć, ile będziesz potrzebował płytek innego rozmiaru do wyłożenia wszystkich krawędzi przy ścianach.
Przemieszczaj się w obu kierunkach od pierwszej płytki, tworząc kąt prosty i wypełnij brakujące miejsca. Jeśli pokój ma nieregularne kształty, będzie ci potrzebny kawałek drewienka do zaznaczania szerokości płytek.
Gdzie umieścić pierwszą płytkę?
Pierwsza płytka może się znaleźć w jednej z czterech pozycji:
1 Jej środek pokrywa się z punktem przecięcia kredowych linii.
2 Jej środek leży na linii prowadzącej.
3 Jej boki leżą na kącie prostym.
4 Jej środek znajduje się na drugiej z linii.
Kolejność układania płytek
W obrębie każdego kwadratu przesuwaj się w obu kierunkach od punktu wyjścia, tworząc kąt prosty. Upewnij się, czy przy każdej krawędzi potrzebna będzie ta sama ilość płytek.
 Planowanie jest niezwykle ważną czynnością przy każdej pracy remontowej, szczególnie zaś przy układaniu płytek. Dobry plan pozwoli ci nie tylko osiągnąć porządniejsze i bardziej symetryczne wykończenie, ale także zaoszczędzi niepotrzebnych i kosztownych strat.
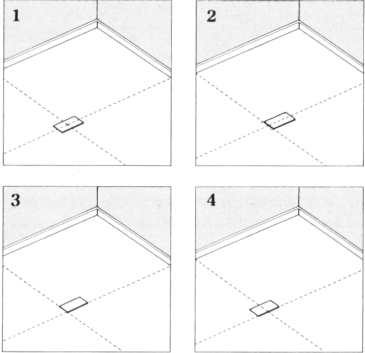 Gdzie umieścić pierwszą płytkę?
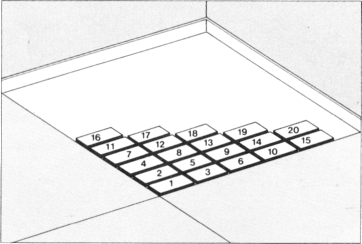 Kolejność układania płytek


