Ceramiczne płytki mozaikowe są naklejane na siatkę lub papier i sprzedawane w arkuszach. Przykleja się je do ściany zwykłym klejem do okładzin ceramicznych. Naklejanie płytek brzegowych i przykrawanie do nietypowych kształtów należy zostawić na koniec. Podobnie jak w przypadku zwykłych płytek ceramicznych, przy naklejaniu mozaiki niezmiernie ważne jest dobre
rozplanowanie, które rozpoczynamy od wytyczenia pionowych i poziomych linii prowadzących. Po naniesieniu kleju na ścianę należy przyklejać do niej arkusze. Płytki zachodzące na narożniki i inne przeszkody należy przyciąć i naklejać osobno.
Jeśli płytki mozaikowe są na arkuszu papieru, należy go tam zostawić aż do wyschnięcia kleju, a następnie nanieść i wcisnąć w szczeliny między płytkami masę spoinową. Wszystkie małe szczeliny można wypełnić spoiwem.
Mocowanie płytek brzegowych
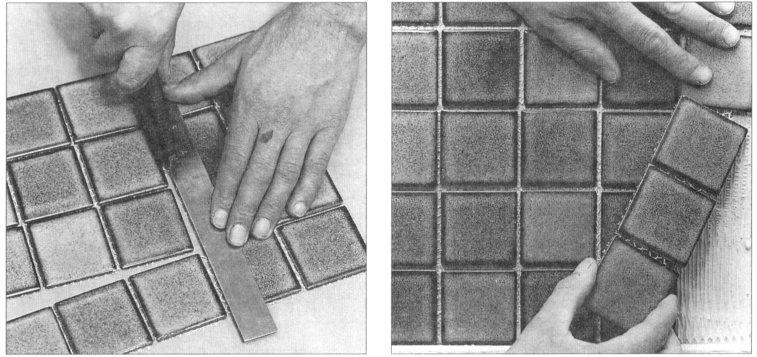
1 Kiedy zasadnicza część ściany pokryta już jest płytkami, można się zabrać za przycinanie płytek brzegowych i płytek zachodzących na zamontowane w ścianie urządzenia.
Zmierz długość i szerokość nie wypełnionych fragmentów ściany, po czym odwróć arkusz i zaznacz linię cięcia. Za pomocą ostrego noża przetnij siatkę lub papier.
2 Nanieś warstwę kleju na ścianę i umieść wycięty pasek na miejscu. Sprawdź, czy płytki brzegowe układają się równo z płytkami naklejonymi obok. Jeśli zostały jeszcze jakieś nie wypełnione miejsca, oderwij pojedyncze kafelki z siatki tub papieru i naklej na ścianę. Na ogól nie zachodzi konieczność przecinania pojedynczych płytek.
 Mocowanie płytek brzegowych


?")


